Josh先生に、もっと目的をもって勉強したほうがよいとアドバイスされました。
他のクラスでは、授業は質問で終わってしまうそうで。
もっと英語勉強しないと。。。。
【今週覚えたこと】
・be Impressived with ....
(尊敬的な感情はなく)感動した、感銘をうけて
・I'm Fade up with ...
うんざりする
【参考URL】 http://オンライン英会話ガイド.com/phrase/intermediate/fed-up.html
・ All of ....
殆どすべて ( almost ではなく、All of を使う)
【参考URL】 http://dictionary.goo.ne.jp/ej/2089/meaning/m0u/
・ I don't remember
覚えてません
(今週は野々村元議員が90回も発した言葉なので、英語だとどういうのかJosh先生に教えてもらいました)
・hibernate
冬眠する
・ off course
当たり前!
【授業内容】
英語文法では、仮定法といったような。
文を完成させる思考のテストでした。
・If I execise more, ________________________________________________
⇒(例) If I execise more, I'll take part in marason.
・If ________________________________________________, I'll have to move.
⇒(例) If I change my job, I'll have to move.
・If ________________________________________________, I might buy a new car.
⇒(例) If I crashed my car, I might buy a new car.
・If ________________________________________________, I'll be very surprised.
⇒(例)If I find the treasure, I'll be very surprised.
・If ________________________________________________, I'll be very happy.
⇒(例)If I speak English fluently, I'll be very happy.
【宿題】
1、授業で勉強した事を、使って今と昔の仮定文を作成する
1) 昔
If I was student, I studied abroad.
⇒〇I would study abroad, I studied abroad.
2) 未来
If I win lottery, I'll buy apartment.
⇒〇I won lottery, I would buy apartment.
※英語では、マンションもアパートというみたいですね。
http://www.eigowithluke.com/2014/01/apartments/
2、Vocabulary Log
Write words or draw pictures to help you remember.(思い出す為の言葉を考える)
・communicate in a different language 異なる言語を使う ⇒ speak English
・earn your own spending money こづかいを稼ぐ ⇒ doing side work
・experience culture shock ⇒ surprise in foregin country.
・fall in love ⇒in love
・fall out of love 恋にさめる ⇒usual after love. ⇒〇Stop loving
・feel better about yourself ⇒study myself
・feel jealous ⇒envious
・feel really tired ⇒exhausted
・feel worse about yourself ⇒ dislike
・get a part-time job ⇒ get a side work
・get in shape 体を鍛える ⇒wan to get muscle
・get into a good college ⇒ be Tokyo unv. student
・get married ⇒wife an husband
・get valuable work experience 貴重な仕事の経験をする⇒doing precious work.
・have a lot more free time ⇒vacation
・improve your grades ⇒ develop myself
・join a gym ⇒take part in gym
・learn a new language ⇒Spanish
・move to a foreign country ⇒go abroad
・pay membership dues 会費を払う ⇒pay money in circle ⇒〇pay money in club
・start a new job ⇒change company⇒〇quit company
・stop studying ⇒forgive study
・study very hard ⇒ hard study
2016年1月31日日曜日

2016年1月26日火曜日
【HTML5】 CSS と JQuery を使って、Treeview を作成する
ツリービューは、いろいろ便利ですよね。
下の参考URLにあるツリービューを試してみました。
ポイントは、
・リスト(ul/li)を使って、ツリーを作成する
・要素クリックイベントを定義して、子要素表示非表示を制御する
選択した子要素はクラスを定義し直して、CSSで定義した装飾を行う
・クリックイベントは、javaScriptを使って、clickイベントを定義する
javaScript内では、jQueryを仕様する($(document)などの$の使い方は、jQueryを勉強して覚える)
・要素の装飾はCSSファイルで定義する
1、HTML
1) <head>にjqueryと、作成するJavaScriptファイルを定義する
2) <head>に使用するcssファイルを定義する
3) <body> にツリービューのリストを記載する
TreeContainerが親要素、tree以下が子要素(ツリー)となります。
ツリーはリスト(ul,li)で作成します。
<head>
<script src="jquery-1.10.2.min.js"></script>
<script src="treeview.js"></script>
<link href="Style.css" rel="stylesheet" />
</head>
<body>
<div class="TreeContainer" >
<div class="ParentPlace">
<span>藤沢小学校</span>
</div>
<br><br>
<ul class="tree">
<li>
<span>1</span>
<img src="Images/ChildNode.png" />
<a> 1年 </a>
<ul>
<li>
<span>3</span>
<img src="Images/ChildNode.png" />
<a>A組</a>
<ul>
<li><a>鈴木先生</a></li>
<li>
<span>3</span>
<img src="Images/ChildNode.png" />
<a>Hydarbad</a>
<ul>
<li><a>生徒:青木</a></li>
<li><a>生徒:浅野</a></li>
<li><a>生徒:高橋</a></li>
</ul>
</li>
</ul>
</li>
</ul>
</li>
<li>
<span>3</span>
<img src="Images/ChildNode.png" />
<a>2年</a>
<ul>
<li><a>A組</a></li>
<li><a>B組</a></li>
<li>
<span>3</span>
<img src="Images/ChildNode.png" />
<a>佐藤先生</a>
<ul>
<li><a>江口</a></li>
</ul>
</li>
</ul>
</li>
</ul>
</div>
</body>
下図がブラウザに表示された絵となります。

2、JavaScriptコード
treeview.jsにJavaScriptのコードを記載する
(1) LoadChildrenで、子要素表示非表示を制御します
(2) NodeSelectionで、クラスの定義し直しします(removeClass/addClass)
(3) $(document).readyで、で「HTML=DOMの読み込みが終わったらfunction()の中の処理(=なにかしらの処理)を実行」します。
コードは、画像クリックしたら、 LoadChildrenを実行し、treeのliをクリックしたらremoveClassで、 CSSクラスを削除し、addClassで"selected"クラスを定義し直します
※クラスを定義し直して、CSSで定義したスタイルを使って装飾しなおします。
function LoadChildren(ctrl) {
if ($(ctrl).next('a').next('ul').is(':visible')) {
$(ctrl).next('a').next('ul').hide('slow');
$(ctrl).attr('src', '/Images/ChildNode.png');
}
else {
$(ctrl).next('a').next('ul').show('slow');
$(ctrl).attr('src', 'Images/ChildNode.png');
}
}
function NodeSelection(ctrl) {
$('ul.tree li').find('a').each(function () { $(this).removeClass(); })
$(ctrl).addClass("selected");
}
$(document).ready(function () {
$('ul.tree li').each(function () {
$(this).children('img').click(function () {
LoadChildren(this);
});
});
$('ul.tree li a').click(function (e) {
$('ul.tree li').find('a').each(function () { $(this).removeClass(); })
$(this).addClass("selected");
});
});
3、CSS定義
Style.cssを作成します。
ファイル内では、クラス(TreeContainerなど)の装飾定義をします。
要素を選択した時の”selected”要素も定義します。
.TreeContainer {
border: solid 0px red;
width: 350px;
height: 400px;
overflow-y: auto;
padding: 10px;
}
.TreeContainer .ParentPlace {
border: solid 0px silver;
padding: 5px;
font-size: 10pt;
font-family: 'Segoe UI';
width:auto;
}
TreeContainer .ParentPlace span {
float:left;
border:dashed 2px silver;
padding:5px;
border-top-right-radius:20px;
border-bottom-right-radius:20px;
}
.TreeContainer .MyPlace {
border: solid 0px silver;
padding: 5px;
font-size: 10pt;
font-family: 'Segoe UI';
width:auto;
}
.TreeContainer .MyPlace span {
float:left;
border:dashed 2px silver;
padding:5px;
border-top-right-radius:20px;
border-bottom-right-radius:20px;
}
TreeContainer ul.tree,
ul.tree ul {
list-style-type: none;
background: url(Images/vline.png) repeat-y;
margin: 0;
padding: 0;
cursor: pointer;
border: solid 0px black;
-webkit-touch-callout: none;
-webkit-user-select: none;
-khtml-user-select: none;
-moz-user-select: none;
-ms-user-select: none;
user-select: none;
margin-left:5px;
margin-top:0px;
}
TreeContainer ul.tree ul {
margin-left: 10px;
cursor: pointer;
-webkit-touch-callout: none;
-webkit-user-select: none;
-khtml-user-select: none;
-moz-user-select: none;
-ms-user-select: none;
user-select: none;
}
.TreeContainer ul.tree li {
margin: 0;
padding: 0 12px;
line-height: 20px;
background: url(Images/node.png) no-repeat;
cursor: pointer;
-webkit-touch-callout: none;
-webkit-user-select: none;
-khtml-user-select: none;
-moz-user-select: none;
-ms-user-select: none;
user-select: none;
}
.TreeContainer ul.tree li span {
background-color: green;
padding: 2px 6px;
border-radius: 10px;
color: white;
}
TreeContainer ul.tree li a {
/*background-color: green;
padding: 2px 6px;
border-radius: 10px;
color: white;*/
}
.selected {
background-color: green;
padding: 2px 6px;
border-radius: 10px;
color: white;
}
selected:hover {
color:yellow;
}
.TreeContainer ul.tree li.last {
background: url(Images/lastnode.png) no-repeat;
cursor: pointer;
-webkit-touch-callout: none;
-webkit-user-select: none;
-khtml-user-select: none;
-moz-user-select: none;
-ms-user-select: none;
user-select: none;
}
.TreeContainer ul.tree li:last-child {
background: #fff url(Images/lastnode.png) no-repeat;
cursor: pointer;
-webkit-touch-callout: none;
-webkit-user-select: none;
-khtml-user-select: none;
-moz-user-select: none;
-ms-user-select: none;
user-select: none;
}
.TreeContainer ul.tree div:hover {
text-decoration: underline;
}
※Images/ChildNode.pngは、参考URLにあるファイル一式ダウンロードすると入っています。
【参考URL】
http://www.codeproject.com/Tips/1073289/Treeview-in-HTML-using-CSS-and-JQuery
下の参考URLにあるツリービューを試してみました。
ポイントは、
・リスト(ul/li)を使って、ツリーを作成する
・要素クリックイベントを定義して、子要素表示非表示を制御する
選択した子要素はクラスを定義し直して、CSSで定義した装飾を行う
・クリックイベントは、javaScriptを使って、clickイベントを定義する
javaScript内では、jQueryを仕様する($(document)などの$の使い方は、jQueryを勉強して覚える)
・要素の装飾はCSSファイルで定義する
1、HTML
1) <head>にjqueryと、作成するJavaScriptファイルを定義する
2) <head>に使用するcssファイルを定義する
3) <body> にツリービューのリストを記載する
TreeContainerが親要素、tree以下が子要素(ツリー)となります。
ツリーはリスト(ul,li)で作成します。
<head>
<script src="jquery-1.10.2.min.js"></script>
<script src="treeview.js"></script>
<link href="Style.css" rel="stylesheet" />
</head>
<body>
<div class="TreeContainer" >
<div class="ParentPlace">
<span>藤沢小学校</span>
</div>
<br><br>
<ul class="tree">
<li>
<span>1</span>
<img src="Images/ChildNode.png" />
<a> 1年 </a>
<ul>
<li>
<span>3</span>
<img src="Images/ChildNode.png" />
<a>A組</a>
<ul>
<li><a>鈴木先生</a></li>
<li>
<span>3</span>
<img src="Images/ChildNode.png" />
<a>Hydarbad</a>
<ul>
<li><a>生徒:青木</a></li>
<li><a>生徒:浅野</a></li>
<li><a>生徒:高橋</a></li>
</ul>
</li>
</ul>
</li>
</ul>
</li>
<li>
<span>3</span>
<img src="Images/ChildNode.png" />
<a>2年</a>
<ul>
<li><a>A組</a></li>
<li><a>B組</a></li>
<li>
<span>3</span>
<img src="Images/ChildNode.png" />
<a>佐藤先生</a>
<ul>
<li><a>江口</a></li>
</ul>
</li>
</ul>
</li>
</ul>
</div>
</body>
下図がブラウザに表示された絵となります。
2、JavaScriptコード
treeview.jsにJavaScriptのコードを記載する
(1) LoadChildrenで、子要素表示非表示を制御します
(2) NodeSelectionで、クラスの定義し直しします(removeClass/addClass)
(3) $(document).readyで、で「HTML=DOMの読み込みが終わったらfunction()の中の処理(=なにかしらの処理)を実行」します。
コードは、画像クリックしたら、 LoadChildrenを実行し、treeのliをクリックしたらremoveClassで、 CSSクラスを削除し、addClassで"selected"クラスを定義し直します
※クラスを定義し直して、CSSで定義したスタイルを使って装飾しなおします。
function LoadChildren(ctrl) {
if ($(ctrl).next('a').next('ul').is(':visible')) {
$(ctrl).next('a').next('ul').hide('slow');
$(ctrl).attr('src', '/Images/ChildNode.png');
}
else {
$(ctrl).next('a').next('ul').show('slow');
$(ctrl).attr('src', 'Images/ChildNode.png');
}
}
function NodeSelection(ctrl) {
$('ul.tree li').find('a').each(function () { $(this).removeClass(); })
$(ctrl).addClass("selected");
}
$(document).ready(function () {
$('ul.tree li').each(function () {
$(this).children('img').click(function () {
LoadChildren(this);
});
});
$('ul.tree li a').click(function (e) {
$('ul.tree li').find('a').each(function () { $(this).removeClass(); })
$(this).addClass("selected");
});
});
3、CSS定義
Style.cssを作成します。
ファイル内では、クラス(TreeContainerなど)の装飾定義をします。
要素を選択した時の”selected”要素も定義します。
.TreeContainer {
border: solid 0px red;
width: 350px;
height: 400px;
overflow-y: auto;
padding: 10px;
}
.TreeContainer .ParentPlace {
border: solid 0px silver;
padding: 5px;
font-size: 10pt;
font-family: 'Segoe UI';
width:auto;
}
TreeContainer .ParentPlace span {
float:left;
border:dashed 2px silver;
padding:5px;
border-top-right-radius:20px;
border-bottom-right-radius:20px;
}
.TreeContainer .MyPlace {
border: solid 0px silver;
padding: 5px;
font-size: 10pt;
font-family: 'Segoe UI';
width:auto;
}
.TreeContainer .MyPlace span {
float:left;
border:dashed 2px silver;
padding:5px;
border-top-right-radius:20px;
border-bottom-right-radius:20px;
}
TreeContainer ul.tree,
ul.tree ul {
list-style-type: none;
background: url(Images/vline.png) repeat-y;
margin: 0;
padding: 0;
cursor: pointer;
border: solid 0px black;
-webkit-touch-callout: none;
-webkit-user-select: none;
-khtml-user-select: none;
-moz-user-select: none;
-ms-user-select: none;
user-select: none;
margin-left:5px;
margin-top:0px;
}
TreeContainer ul.tree ul {
margin-left: 10px;
cursor: pointer;
-webkit-touch-callout: none;
-webkit-user-select: none;
-khtml-user-select: none;
-moz-user-select: none;
-ms-user-select: none;
user-select: none;
}
.TreeContainer ul.tree li {
margin: 0;
padding: 0 12px;
line-height: 20px;
background: url(Images/node.png) no-repeat;
cursor: pointer;
-webkit-touch-callout: none;
-webkit-user-select: none;
-khtml-user-select: none;
-moz-user-select: none;
-ms-user-select: none;
user-select: none;
}
.TreeContainer ul.tree li span {
background-color: green;
padding: 2px 6px;
border-radius: 10px;
color: white;
}
TreeContainer ul.tree li a {
/*background-color: green;
padding: 2px 6px;
border-radius: 10px;
color: white;*/
}
.selected {
background-color: green;
padding: 2px 6px;
border-radius: 10px;
color: white;
}
selected:hover {
color:yellow;
}
.TreeContainer ul.tree li.last {
background: url(Images/lastnode.png) no-repeat;
cursor: pointer;
-webkit-touch-callout: none;
-webkit-user-select: none;
-khtml-user-select: none;
-moz-user-select: none;
-ms-user-select: none;
user-select: none;
}
.TreeContainer ul.tree li:last-child {
background: #fff url(Images/lastnode.png) no-repeat;
cursor: pointer;
-webkit-touch-callout: none;
-webkit-user-select: none;
-khtml-user-select: none;
-moz-user-select: none;
-ms-user-select: none;
user-select: none;
}
.TreeContainer ul.tree div:hover {
text-decoration: underline;
}
※Images/ChildNode.pngは、参考URLにあるファイル一式ダウンロードすると入っています。
【参考URL】
http://www.codeproject.com/Tips/1073289/Treeview-in-HTML-using-CSS-and-JQuery
2016年1月24日日曜日
【もう一度、英語をやり直そう】英会話日記(1/20) ~本八幡getgo
今日はJosh先生は、休みで変わりに、始めて
Jonmarie(ジョンマリ )先生から授業受けることが出来ました。
自分のヒアリング能力がないので、折角ゆっくり話して頂いているのに、何回も聞きなおすことをしてしまい申し訳なかったです。
もっと、ヒアリング力をつけないと、だめだなあーと感じる日々です。
【今週覚えたこと】
・blogは、発音は「ブラグ」と言うそうです。
・土曜日曜は、holidayでなく、weekendという。
⇒日本では、土曜日曜日は休日なのでつい、holidayと言ってしまいますが、holidayは祝日の意味なので、土曜日曜はweekendを使うそうです。
【授業内容】
祝日について、説明をする会話の勉強をしました。
・is a day when ~
(例) Christmas is a day when I eat special cake.
・was a day when ~(過去)
(例) Fathe's day is a day when I present a shirt.
・will be a day when ~(未来)
(例)Holloween will be a day when my children wear costumes.
たしか、受験勉強では、関係副詞として勉強しました。
詳しくは、以下のサイトを一読すると理解できると思います。
http://www.englishcafe.jp/english3rd/day68.html
【宿題】whenを使って5文を作る(time/month/hour)
7:00am is a time when I get up.
October 6th is a day when I was burn.
Feburary is a month when it is cold.
9:00am is a hour when I must arrive at company.
65 years old is a time when I will retire.
 ※上記画像クリックでHPにジャンプします(Jonmarie先生プロフィール確認できます)
Jonmarie(ジョンマリ )先生から授業受けることが出来ました。
自分のヒアリング能力がないので、折角ゆっくり話して頂いているのに、何回も聞きなおすことをしてしまい申し訳なかったです。
もっと、ヒアリング力をつけないと、だめだなあーと感じる日々です。
【今週覚えたこと】
・blogは、発音は「ブラグ」と言うそうです。
・土曜日曜は、holidayでなく、weekendという。
⇒日本では、土曜日曜日は休日なのでつい、holidayと言ってしまいますが、holidayは祝日の意味なので、土曜日曜はweekendを使うそうです。
【授業内容】
祝日について、説明をする会話の勉強をしました。
・is a day when ~
(例) Christmas is a day when I eat special cake.
・was a day when ~(過去)
(例) Fathe's day is a day when I present a shirt.
・will be a day when ~(未来)
(例)Holloween will be a day when my children wear costumes.
たしか、受験勉強では、関係副詞として勉強しました。
詳しくは、以下のサイトを一読すると理解できると思います。
http://www.englishcafe.jp/english3rd/day68.html
【宿題】whenを使って5文を作る(time/month/hour)
7:00am is a time when I get up.
October 6th is a day when I was burn.
Feburary is a month when it is cold.
9:00am is a hour when I must arrive at company.
65 years old is a time when I will retire.
2016年1月20日水曜日
【もう一度、英語をやり直そう】英会話日記(1/13) ~本八幡getgo
気がつくと、あっという間に一週間が立ちました。
復習しないと。。。。。。
【今週覚えたよく使う言葉・単語】
・I'll let you off
ゆるしてあげる
※let の使い方は以下のサイト一読おすすめします。
https://kotobank.jp/ejword/let
・talk/speak/tellの違い
talk=ちょっと話す、speak=話しかける、tell=order(命令する)
・cheeky
ずるい!
【授業内容】
・be used to ~/ be used for ~の使い方
be used forの後ろは、名詞か動名詞になります。be used toの後ろは、動詞原型となります。
ただし、be used to ~で「~に慣れている」の場合は動名詞となるようです。
例文:
used to ~(~=原形動詞)・・・~したものだ、かつて~だった
My father used to go fishing on Sundays.
・be used to ~(~=名詞・動名詞)・・・~に慣れている
I'm used to eating Japanese food.
・be used to ~(~=原形動詞)・・・~するために使われる
Computers are used to make our life more convenient.
・be used for ~(~=名詞・動名詞)・・・~のために使われる
Computers are used for making our life more convenient.
【宿題】Your Vocabulary Log
(似た単語を書き出す:
Make a vocabulary log. Write words or draw pictures to help you remember)
battery :power
browse : internet explore
CD-ROM : disk
create : make
cut and paste : copy
document : electric paper
double-click(on) : mouse click
drag and drop : copy document
edit: modify
flash dirive :USB
format : initialize
highlight:twinkle
icon : picture
information :
keybord : typing
menu : select
monitor : display
mouse : scroll
open : click
recharge : power
save :cntrl + s
screen : display
store : save
text : notepad
website : homepage
復習しないと。。。。。。
【今週覚えたよく使う言葉・単語】
・I'll let you off
ゆるしてあげる
※let の使い方は以下のサイト一読おすすめします。
https://kotobank.jp/ejword/let
・talk/speak/tellの違い
talk=ちょっと話す、speak=話しかける、tell=order(命令する)
・cheeky
ずるい!
【授業内容】
・be used to ~/ be used for ~の使い方
be used forの後ろは、名詞か動名詞になります。be used toの後ろは、動詞原型となります。
ただし、be used to ~で「~に慣れている」の場合は動名詞となるようです。
例文:
used to ~(~=原形動詞)・・・~したものだ、かつて~だった
My father used to go fishing on Sundays.
・be used to ~(~=名詞・動名詞)・・・~に慣れている
I'm used to eating Japanese food.
・be used to ~(~=原形動詞)・・・~するために使われる
Computers are used to make our life more convenient.
・be used for ~(~=名詞・動名詞)・・・~のために使われる
Computers are used for making our life more convenient.
【宿題】Your Vocabulary Log
(似た単語を書き出す:
Make a vocabulary log. Write words or draw pictures to help you remember)
battery :power
browse : internet explore
CD-ROM : disk
create : make
cut and paste : copy
document : electric paper
double-click(on) : mouse click
drag and drop : copy document
edit: modify
flash dirive :USB
format : initialize
highlight:twinkle
icon : picture
information :
keybord : typing
menu : select
monitor : display
mouse : scroll
open : click
recharge : power
save :cntrl + s
screen : display
store : save
text : notepad
website : homepage
2016年1月19日火曜日
ホームページにGooble mapの地図を埋め込む
Googleマップを使用して、
地図データをホームページに挿入する方法について、説明いたします。
(1) グーグルマップを開く
https://www.google.co.jp/maps/@35.4006885,139.375825,10z?hl=ja
※@の[35.6447272,139.9059724,13z]が緯度経度になります。
(2) 検索欄に、住所を入力して、検索ボタン(虫眼鏡)をクリックします。

(3) 地図のデータを取得(地図の共有または埋め込む)
検索部分の左側に、三本線(メニュー)が表示されています。
メニューを開いて、「地図の共有または埋め込む」を選択する
ダイアログを開いたら、「地図を埋め込む」を選択すると、下図のようなダイアログに変化します。

赤枠の地図を埋め込むを選択すると、埋め込み用のタグが出てきます。
ダイアログ内の埋め込み用のタグ「http~のデータ」をコピーする。
このタブをホームページに埋め込むと表示できます。
※コピーしたiframeタブをそのままホームページに追加すると、
その時は、 frame要素のsrc属性の最後に、「&iwloc=B」を追記します。
(バルーンが表示されて表示できなくなっているようです)
【参考URL】
https://support.google.com/maps/answer/3544418?hl=ja
https://www.healing-solutions.jp/blog/archives/1955/
https://inthecom.net/718
http://www.flapism.jp/other/131/
地図データをホームページに挿入する方法について、説明いたします。
(1) グーグルマップを開く
https://www.google.co.jp/maps/@35.4006885,139.375825,10z?hl=ja
※@の[35.6447272,139.9059724,13z]が緯度経度になります。
(2) 検索欄に、住所を入力して、検索ボタン(虫眼鏡)をクリックします。

(3) 地図のデータを取得(地図の共有または埋め込む)
検索部分の左側に、三本線(メニュー)が表示されています。
メニューを開いて、「地図の共有または埋め込む」を選択する
ダイアログを開いたら、「地図を埋め込む」を選択すると、下図のようなダイアログに変化します。

赤枠の地図を埋め込むを選択すると、埋め込み用のタグが出てきます。
ダイアログ内の埋め込み用のタグ「http~のデータ」をコピーする。
このタブをホームページに埋め込むと表示できます。
※コピーしたiframeタブをそのままホームページに追加すると、
「このコンテンツはフレーム内で表示できません」
が表示される場合があります。その時は、 frame要素のsrc属性の最後に、「&iwloc=B」を追記します。
(バルーンが表示されて表示できなくなっているようです)
【参考URL】
https://support.google.com/maps/answer/3544418?hl=ja
https://www.healing-solutions.jp/blog/archives/1955/
https://inthecom.net/718
http://www.flapism.jp/other/131/
2016年1月14日木曜日
レスポンシブルウェッブサイト開発で便利なサイト
レスポンシブルウェッブサイト開発で、ブラウザ幅に合わせて、サイト変更した場合に、
ブラウザ幅を変更して、サイトを確認します。
しかし、実際のブラウザ幅が分かりませんので、次のサイトを使って、ブラウザ幅を変更することが
できます。
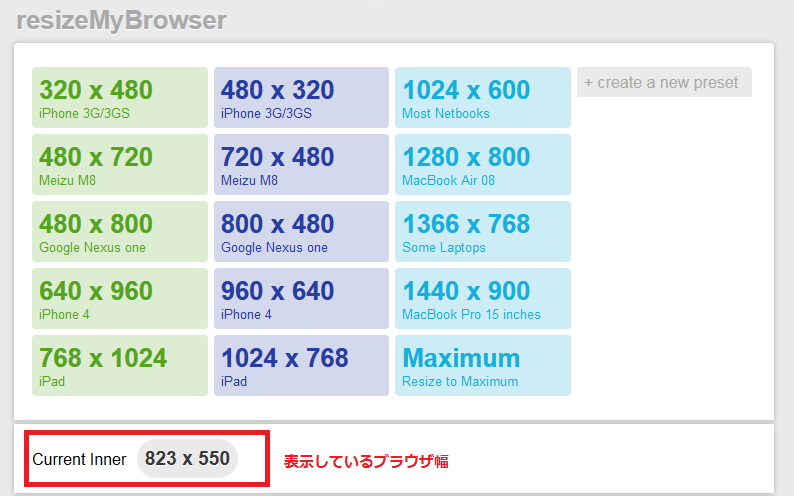
resizeMyBrowser
はブラウザのウィンドウサイズを変更できるサイトです。
ブラウザサイズをワンクリックで変更してデザインのチェックをするときに利用しましょう。初期設定で用意されているもの以外にも、自分でサイズを指定することも可能です。
http://resizemybrowser.com/
※resizeMyBrowserを表示後、ブラウザ幅を変更すると、
「Current Inner」にブラウザ幅が表示しますので、幅確認できます。

ブラウザ幅を変更して、サイトを確認します。
しかし、実際のブラウザ幅が分かりませんので、次のサイトを使って、ブラウザ幅を変更することが
できます。
resizeMyBrowser
はブラウザのウィンドウサイズを変更できるサイトです。
ブラウザサイズをワンクリックで変更してデザインのチェックをするときに利用しましょう。初期設定で用意されているもの以外にも、自分でサイズを指定することも可能です。
http://resizemybrowser.com/
※resizeMyBrowserを表示後、ブラウザ幅を変更すると、
「Current Inner」にブラウザ幅が表示しますので、幅確認できます。
2016年1月10日日曜日
レスポンシブルホームページスマートフォン用メニュー
HTML5で<nav>タグをメニューを作成したのですが、
1列表示すると、メニューが長くみづらくなっていました。
そこで、二列にする方法がないかしらべたところ、以下のサイトに2列表示できる方法が書いてありました。
navスマホで横2列の縦組み、パソコンで均等な横並びになるレスポンシブなナビゲーションメニュー
http://gakublog.com/archives/1069
弟のホームページに、実装してみました。
http://www.mitsuo-chousei.com/
興味ある方は、
Responsible Desing Tesstページで確認してみてください。
http://mattkersley.com/responsive/
1列表示すると、メニューが長くみづらくなっていました。
そこで、二列にする方法がないかしらべたところ、以下のサイトに2列表示できる方法が書いてありました。
navスマホで横2列の縦組み、パソコンで均等な横並びになるレスポンシブなナビゲーションメニュー
http://gakublog.com/archives/1069
弟のホームページに、実装してみました。
http://www.mitsuo-chousei.com/
興味ある方は、
Responsible Desing Tesstページで確認してみてください。
http://mattkersley.com/responsive/
登録:
投稿 (Atom)